Getting Started With Intra Manager
- Using the NAPT Intra Wizard
- Ordering an Intra via the Customer Portal
- NAPT Staff to assist with INTRA ILC/PT Development
- ISO 17043 Compliant Intra
- Setting Intra Schedule & Location
- Login to the Customer Portal
- Select Intra from the top menu. On the left menu, the Intra Manager is broken into three sections.
-
- Pending Development: These are Intras that have been purchased and are ready to be started.
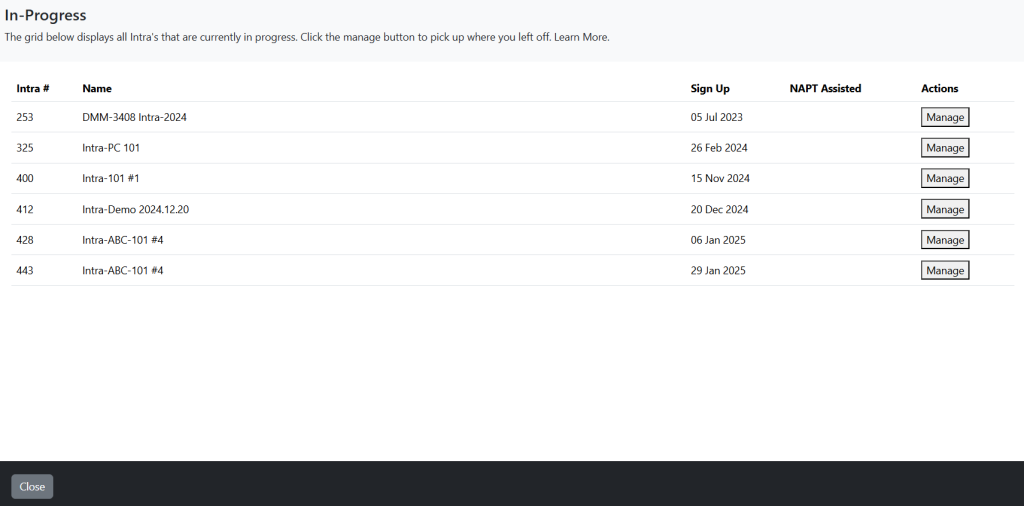
- In-Progress: These are Intras that are currently In-Progress. This would include waiting to set participant schedule, submit data, run analysis or run reports.
- Completed Intras: These are Intras that are complete. You can run reports, but no other action can be taken.
-
- What you would like to name your Intra
- Kit & Artifact details. You should have the Model and Serial Number of each artifact. In addition, you need to know your measured values.
- Who will participate in your Intra. You need at least three people.
-
- Intra Name – The name used throughout the Intra Creation Process
- Intra Description – This description appears on your printed reports
- ISO 17043 Compliant – If you select Yes, please note you need to complete the entire ISO Process before you can issue reports
- Coordinator – Who designed the Intra
- Algorithm – When we determine your Reference Value and Reference Uncertainty, which mathematical calculation should be used based on ISO 17043
- Outlier Method – When determining what values are an outlier, which method should be used
- Kit Name – This is the name of your kit. In the next step, you will add the artifacts that make up your kit
- Login to the Customer Portal
- Navigate to Intra at the top of the page
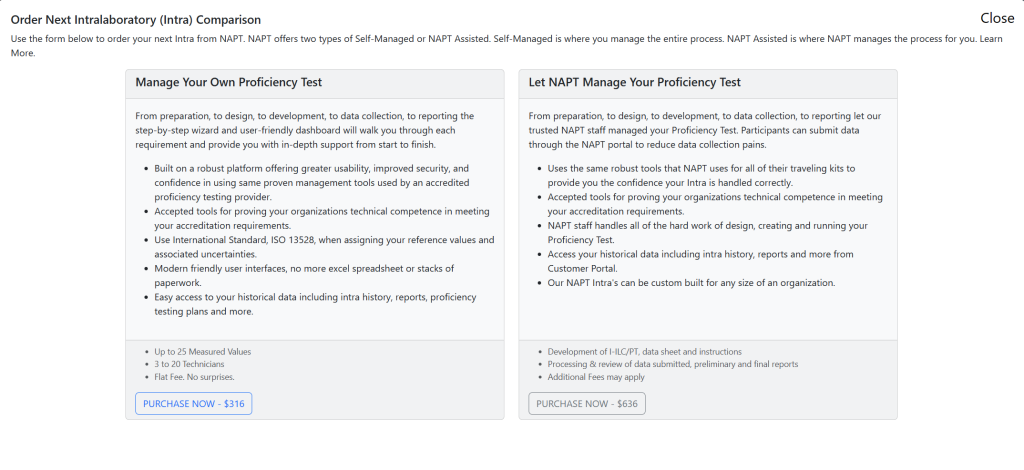
- Click on Order Next Intra
- On the resulting page you will be given the option to order two types of Intras being offered by NAPT:
- Manage Your Own Proficiency Test – This is the self-managed Intra where you as the customer will use our new Intra wizard to walk you through the process. Don’t worry, if you have problems, you can always reach out to support.
- NAPT Managed – In this option, NAPT will design the scheme and process for you. It takes more time, costs a little more, but you will send all the necessary information to NAPT. They will go through the process and send you the result.
- NAPT Staff are also able to assist in developing and managing a custom intralaboratory comparison. When assistance is required, NAPT will need the following information before beginning development:
- Copy of your Current Test Report/Calibration Certificate for the type of intra-ILC/PT you want developed (what you would normally provide to a customer).
- Uncertainty budget and uncertainty procedure followed for the results reported on your calibration certificate or test report.
- Procedure Identification – If you did not utilize an industry standard practice (e.g., ASTM, ANSI Standard, NAVAIR, T.O., TB) please provide a brief description of the measurement procedure used to perform the ILC/PT.
- Identify up to 10 measurement values to be recorded for this intra-ILC/PT development. Alternatively, you may provide a data reporting sheet showing the measured values to be recorded.
- Participant documents can be submitted by email to napt@www.proficiency.org or via the NAPT Customer Portal.
- Hard copies of Calibration Reports, Uncertainty & Procedure information can be mailed to NAPT at 4445 West 77th Street, Suite 212, Edina, MN 55435.
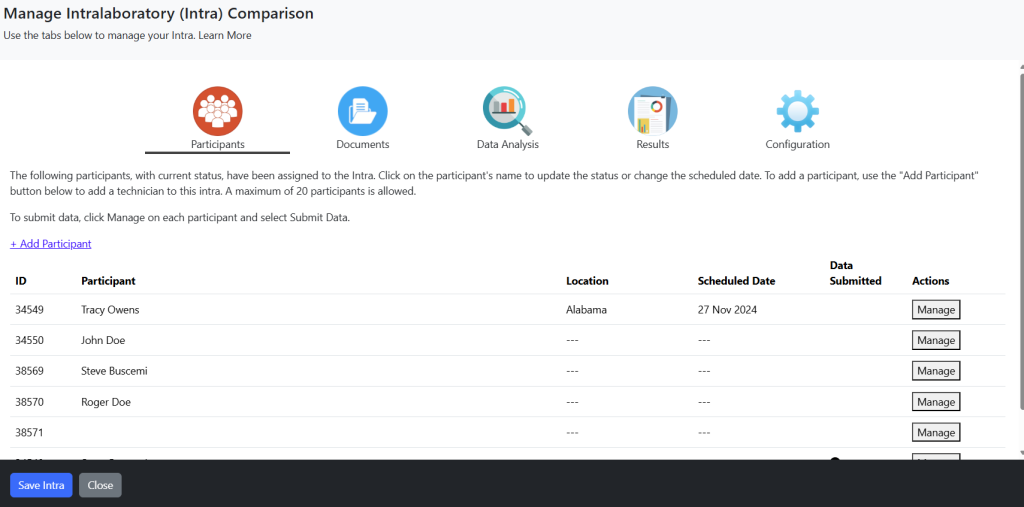
- Login to the Customer Portal
- Using the top menu, navigate to Intra and choose In-Progress Intras.
- Under the In-Progress Intra, select the Intra you wish to Manage.
- From the Participants table, select the Participant’s name you wish to schedule. In the example below, currently no one is scheduled. Click on Manage.
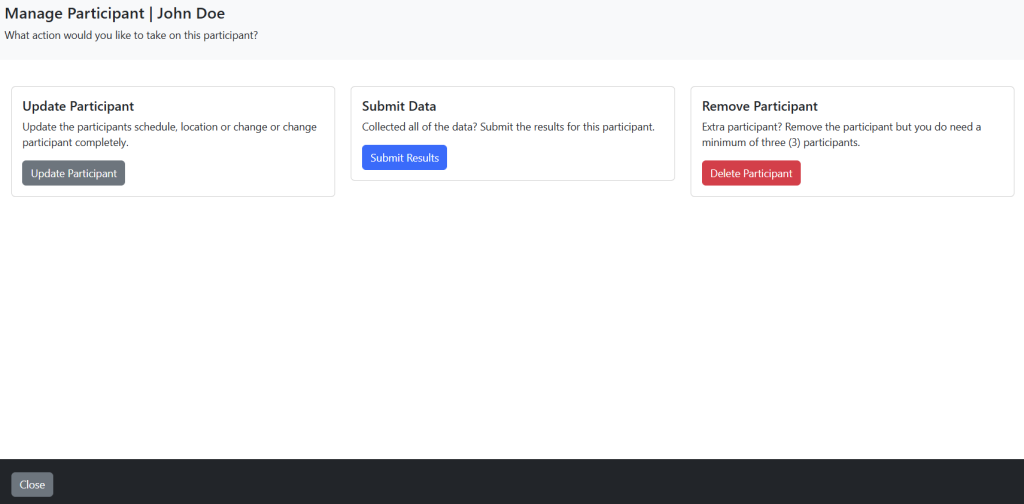
- On the Resulting page, click Update Participant.
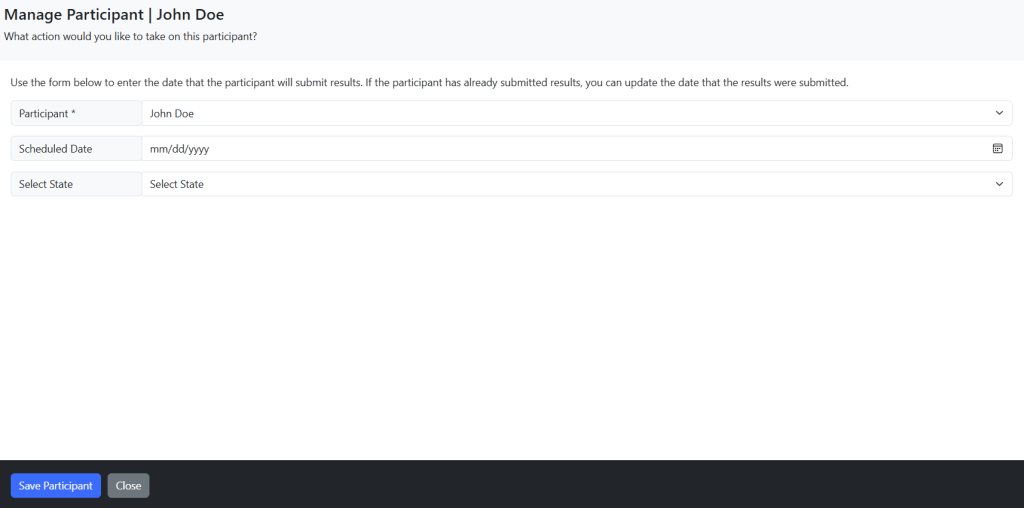
- Enter your changes and click the Save Button.
Using the NAPT Intra Wizard
The NAPT Intra Wizard allows you to plan, manage and report on your internal Intralaboratory Comparisons (Intra).
Launch Wizard
3. Click on an Intra in the Pending Development to get started.
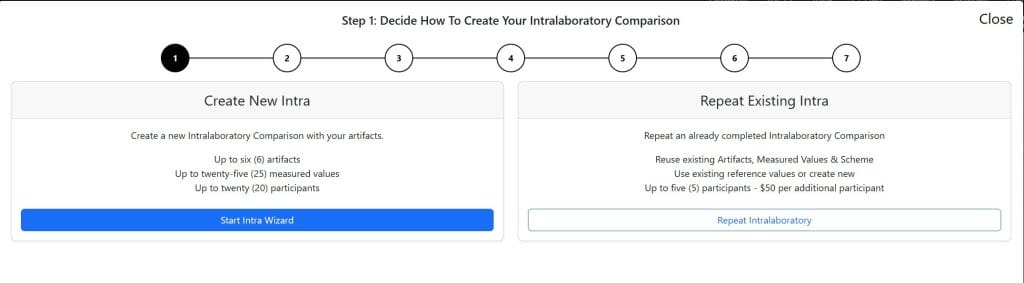
Step 1 – Choose Intra Type
The first step is to choose if you want to start a new Intra or repeat an existing Intra.
Step 2 – Verify You Are Ready
Get ready to complete the setup of your Intra. Before you start, make sure to have the following items ready:
IMPORTANT: If you do not have these items ready, do not start your Intra.
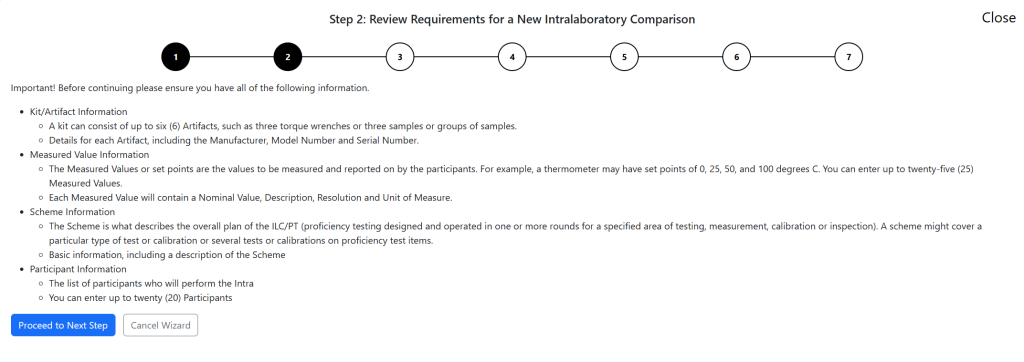
When you are ready, click Next.
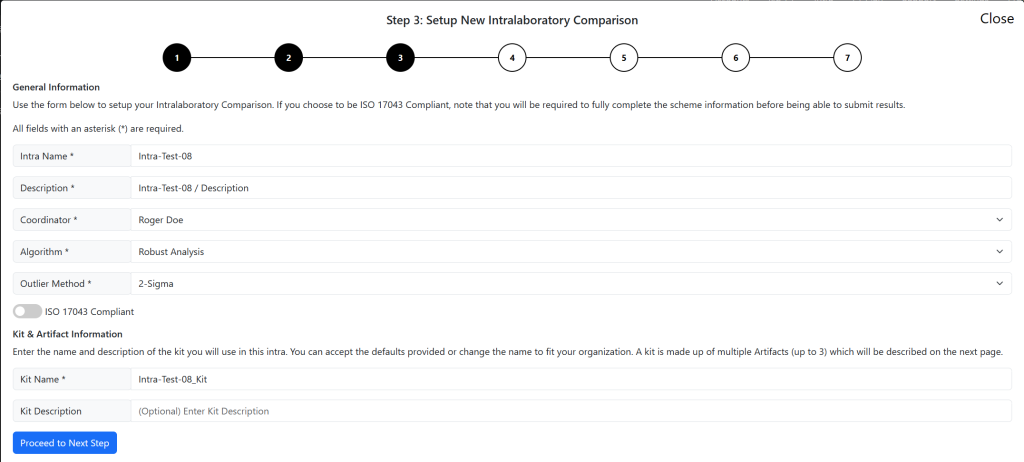
Step 3 – Setup Intra
On the first step of the Intra, submit the required fields to continue the process. Some fields are optional and those are marked as such. The following fields are mandatory and have important considerations.
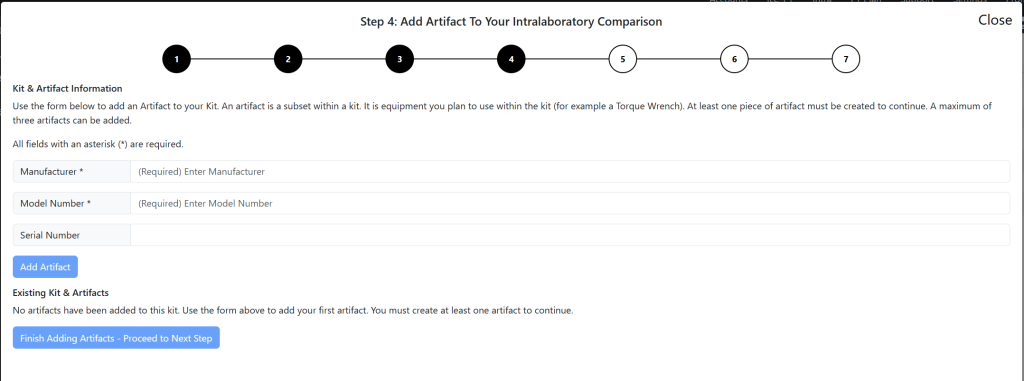
Step 4 – Add Artifacts
In this step, you will add the artifacts that make up your kit. This is the equipment used to take the measurements. You need at least one artifact to continue. You can have a maximum of three.
Enter the Manufacturer, Model Number and Serial Number for each artifact.
Step 5 – Add Measured Values
In this step, you enter the Measured Values (Set Points) that will be used within the Intra. These are the testing points your participants will report on.
You must enter at a minimum one Measured Value. You can enter up to fifteen.
All fields are required.
| Order | The order in which the Measured Value (MV) will appear. |
| Discipline | The related Discipline of the MV |
| Nominal Value | The default / expected value of the MV |
| Description | Additional details about the MV |
| Resolution | The resolution is the number of 0’s right of the decimal point. For example: 0.01 would have a resolution of 20.0001 would have a resolution of 4 |
| Unit of Measure | The unit of the MV |
NOTE: If the Unit of Measurement (UoM) does not exist that you need to use. Pick ANY other Unit of Measurement and contact NAPT Support. We can add the UoM and update your measured values.
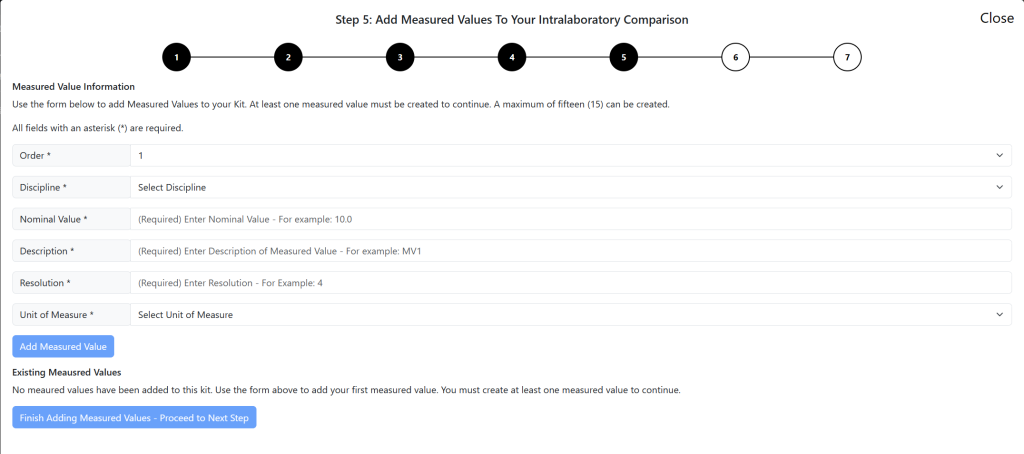
When complete, click next.
Step 6: Participants
In this step, you will define who the participants of your Intra will be. You need a minimum of three (3) participants in order to complete an Intra. There are two options by which to add a participant.
Option 1: The user is already defined in your organization. Use the Drop Down to select the Participant and choose the Add button to the right.
Option 2: Add a new participant using the fields available. When you have entered the information, select Add Participant.

Step 7: Complete
Done: Congrats! You have set up your Intra and you are now ready to schedule and submit data.

Ordering an Intra via the Customer Portal
The Customer Portal allows customers to seamlessly order a new Intra using our easy-to-use wizard.
Steps to Complete
NAPT Staff to assist with INTRA ILC/PT Development
Note: All information submitted to NAPT is kept strictly confidential and anonymous.
ISO 17043 Compliant Intra
When creating an Intra, you have the option to select an ISO 17043 Complaint option. When you select this, you are required to complete the entire scheme design before you are allowed to run any reports or complete the Intra.
ISO 17043 can be a time-consuming exercise. Make sure to plan accordingly before selecting this option.
Setting Intra Schedule & Location
Setting a schedule for your Intra is critical to ensure all participants complete their submission in a timely manner.
Steps to Complete

NOTE: From this page, you may also delete a participant from the Intra.
7. Once you close the Manage Participant window, you will see the participant is now scheduled.
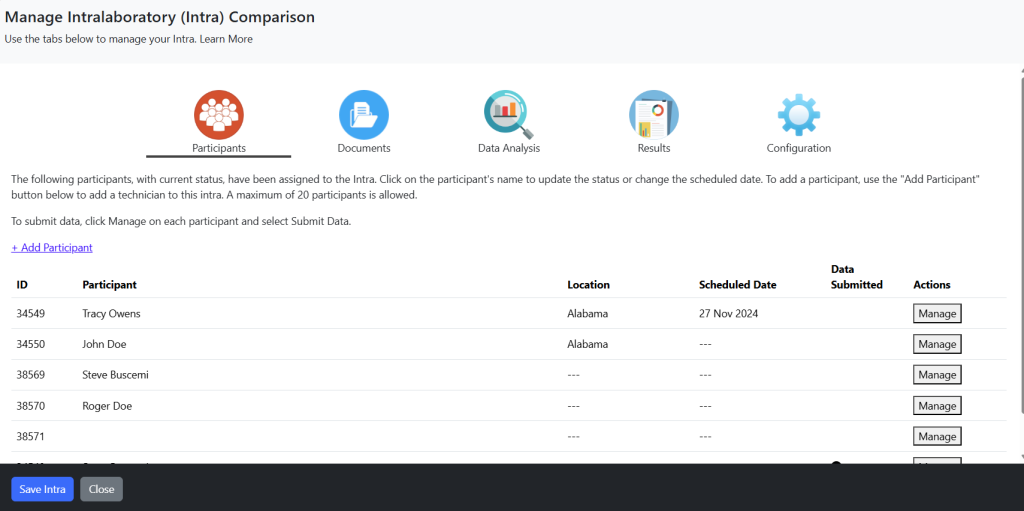
8. Repeat this task until all participants are scheduled.